

TAB TUTORIALS: HALLOWEEN HORRORS 2
Whether you’re looking for ghoulish inspiration, aiming to impress a certain someone with your epic dress-up skills or just itching to get involved in the fright-night fever, our second installment […]
Whether you’re looking for ghoulish inspiration, aiming to impress a certain someone with your epic dress-up skills or just itching to get involved in the fright-night fever, our second installment of Halloween face-paint looks are easy to follow using our step by step photo guide.
Look number one: Skeleton
What you’ll need: White and black face-paint, a sponge, two paintbrushes and some black eyeshadow.
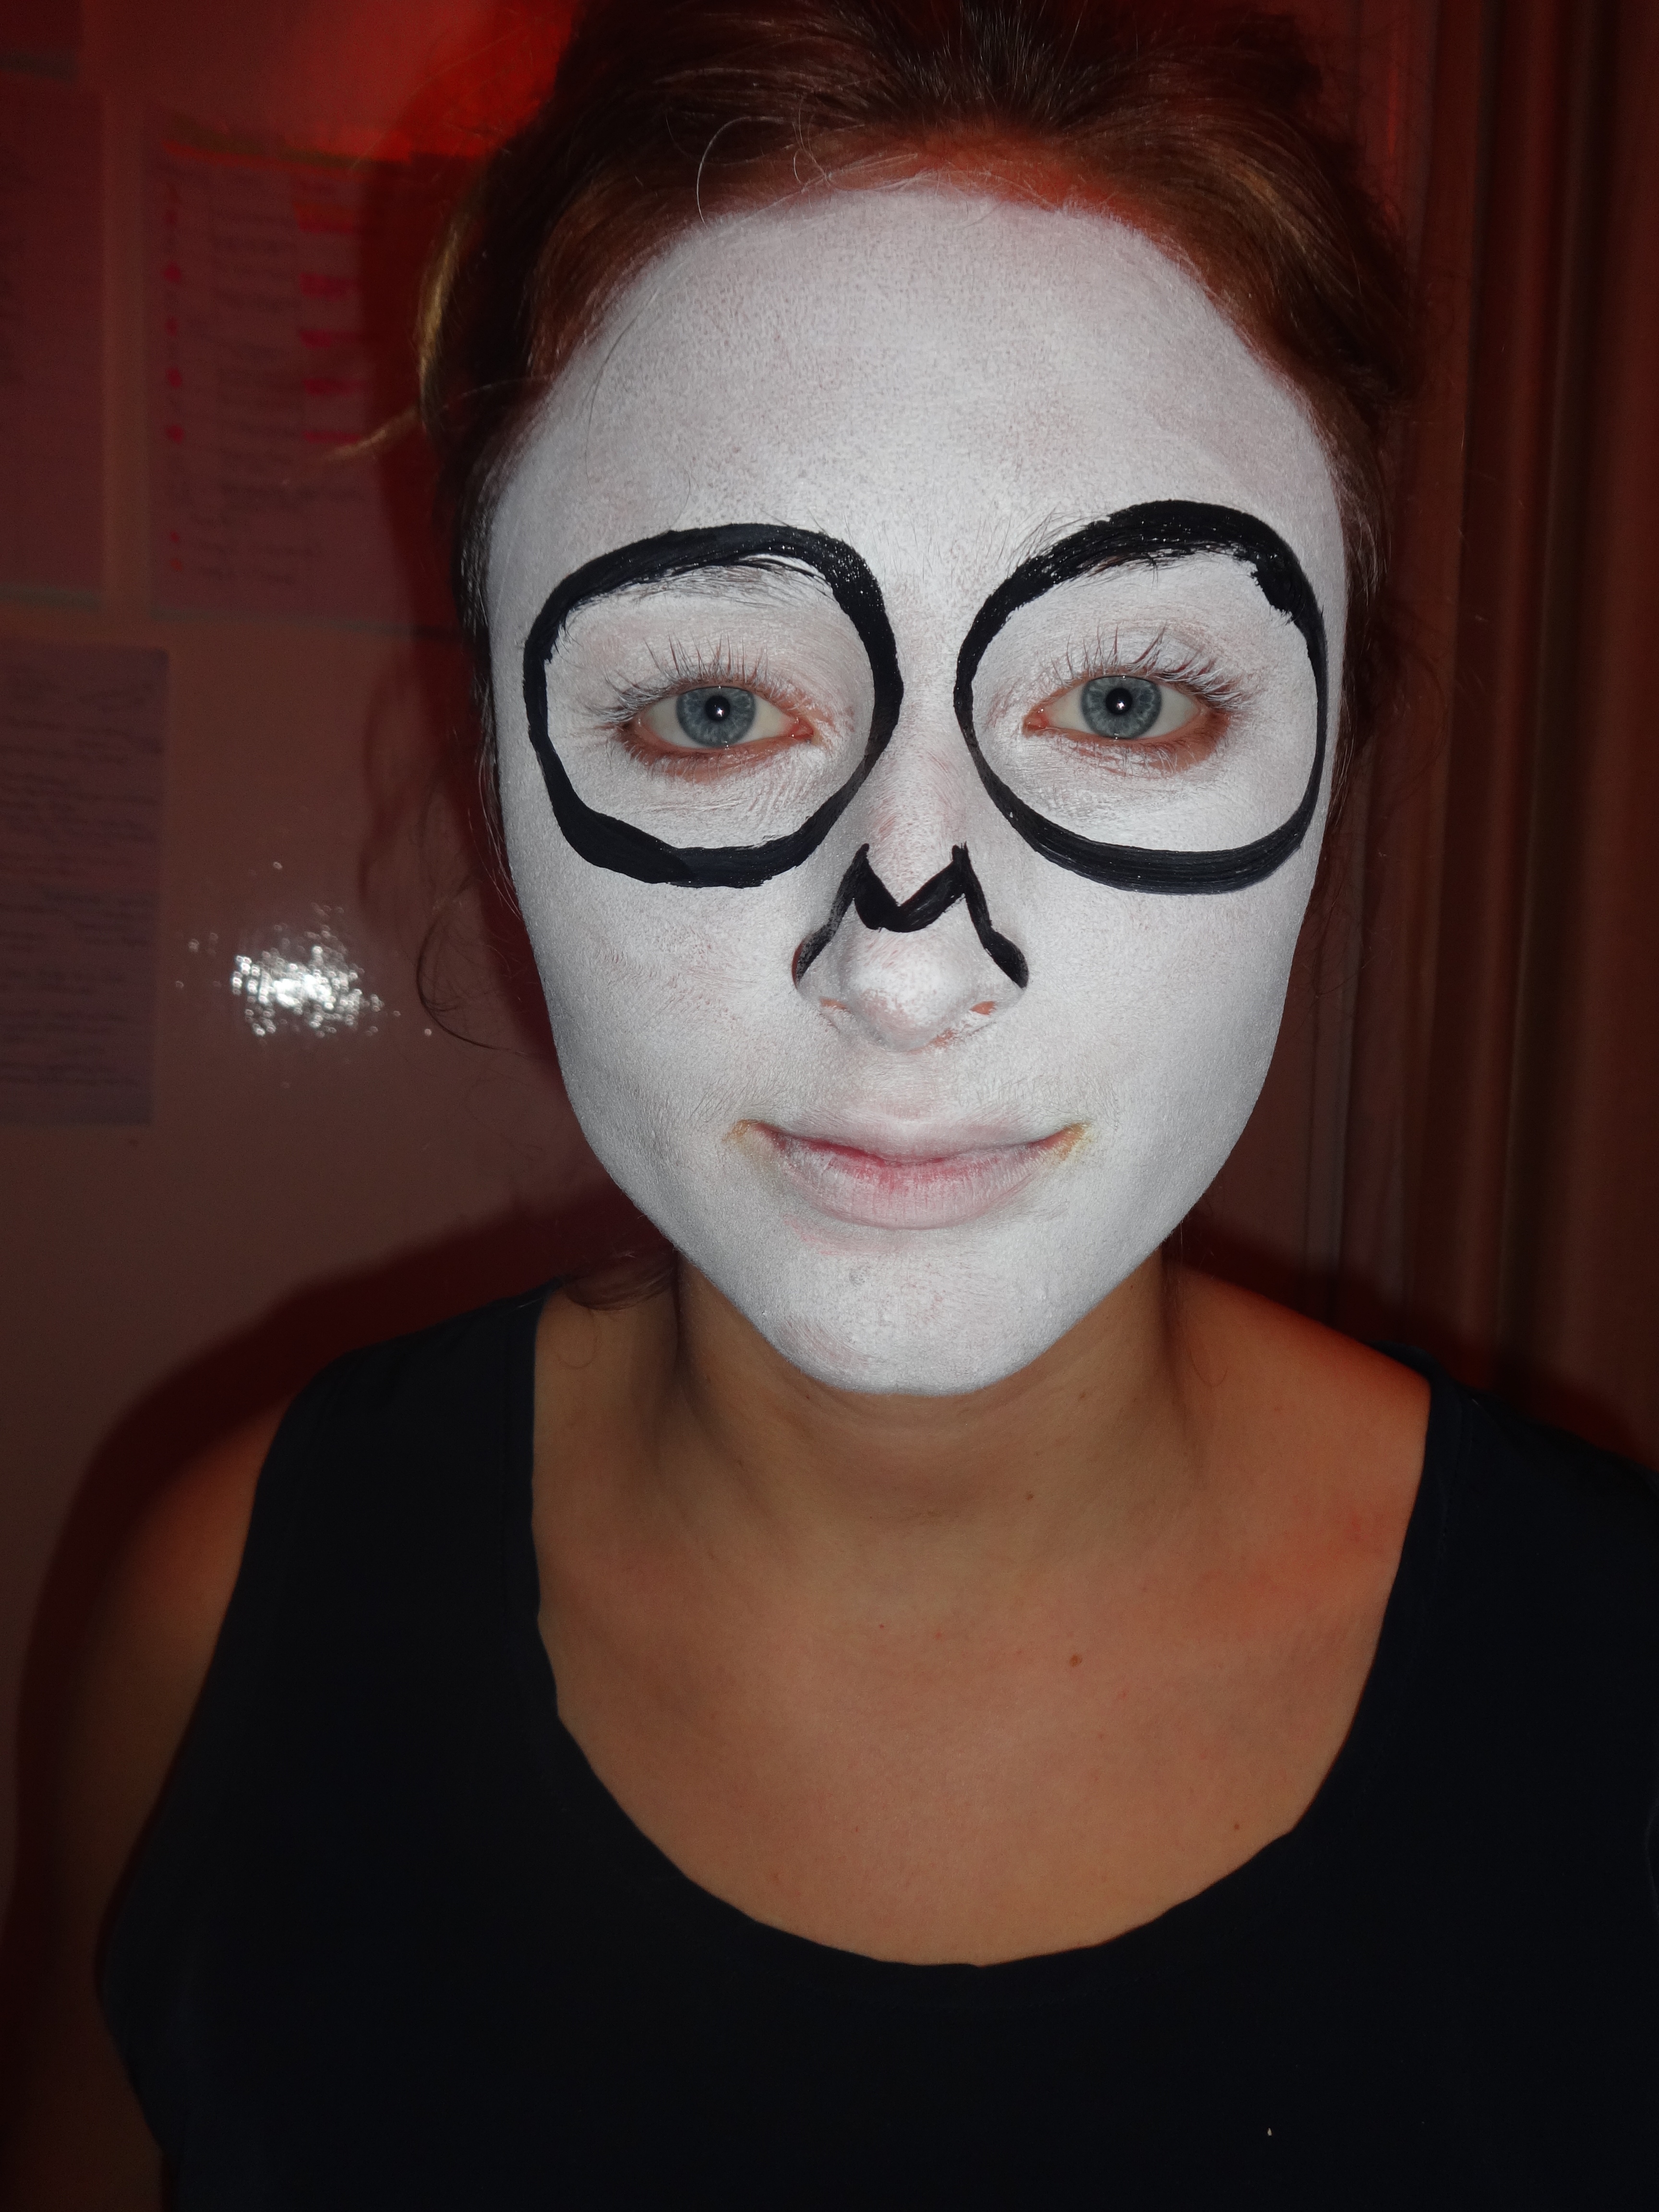
Step 1

Tie your hair back before beginning. Using the sponge, paint your face and neck white, leaving the eye area clean. Outline large circles around the eyes with black paint, recreating the outline shown above on the nose and paint a black line either side of your mouth.
Step 2

Next you need to draw the outline of your cheek bones. We know this looks like a semi-sketched phallus is making its way into your mouth, but fear not skeleton friends, this is only temporary! The section nearest the hairline in a wavy shape will be filled in with black paint later. Continue the black line from the edge of your mouth around in a curved fashion. Aim to ensure that both sides of your face look identical.
Step 3

Fill in the eye sockets and the outline on your nose with the black paint. Mark out the sections either side of your forehead which will be filled in in black in the next step. Neatly add lines above the top lip which will be transformed into the teeth. The lines should be quite thin and evenly spaced out, so try to use a thin paintbrush or even a kohl eyeliner pencil if you have one to hand.
Step 4

Taking your black eyeshadow and a brush, dust on a greyish tint to give extra dimension to the face, in a wide v-shape above the eyebrows, either side of the nose and on the chin. Fill in the forehead and cheek outlines that you drew out previously, making the lines as sharp and neat as possible. Mixing the white and black paint, carefully draw on a few cracks around the the eyes and on the forehead. Then get to work on the mouth, using a thin paintbrush, outline the teeth on the top and bottom lips.
The trick here is to ensure that you don’t paint on rectangular teeth, they should taper up to a thinner point on the top and bottom lips, with the widest point meeting in the middle of your lips. Start off with a grey colour and when you are happy with the design, start to accentuate blacker colours on the corners of the teeth where they meet the middle line.
Step 5

The last step simply requires neatening up the teeth. Lengthening the shadow around the bottom jaw will ensure that your new nashers look as scary as possible. If you have a black eyeliner to hand, you can also outline your eyes to make the whites of your eyes pop!
Our second look for this tutorial is a beautifully colourful Sugar Skull, inspired by the Mexican Day of the Dead festival.
What you’ll need: White, black, red and blue face-paints (the red and blue colours can be changed as you wish), two paintbrushes, a sponge and a pretty floral headband, glitter is also optional if you want to spruce this look up.
Step 1

Using the facepaint sponge, cover your face in white paint. Simple!
Step 2
Outline the eyes and draw a pointy ‘M’ on the bridge of the nose in black paint.
Step 3

Fill in the outlines in black.
Tab top tip: This also doubles up as a fabulous panda look – simply add some cute ears et voila!
Step 4

Using a thin paintbrush (and with a steady hand), draw teardrop shapes all around the eyes in the colour of your choice. Here we chose to use red as it really stands out against the black and white.
Step 5

Mix the white and red paint together to create a pretty pink shade. Using the sponge, dab pink across the tops of the forehead in an ombré manner, so that the the colour slowly fades downwards. Highlight the tops of cheekbones, then paint a spider web on the forehead – it can be quite tricky to ensure that the lines are the same width the whole way across, so if you’re dubious simply use a kohl eyeliner pencil to trace them out first.
Step 6
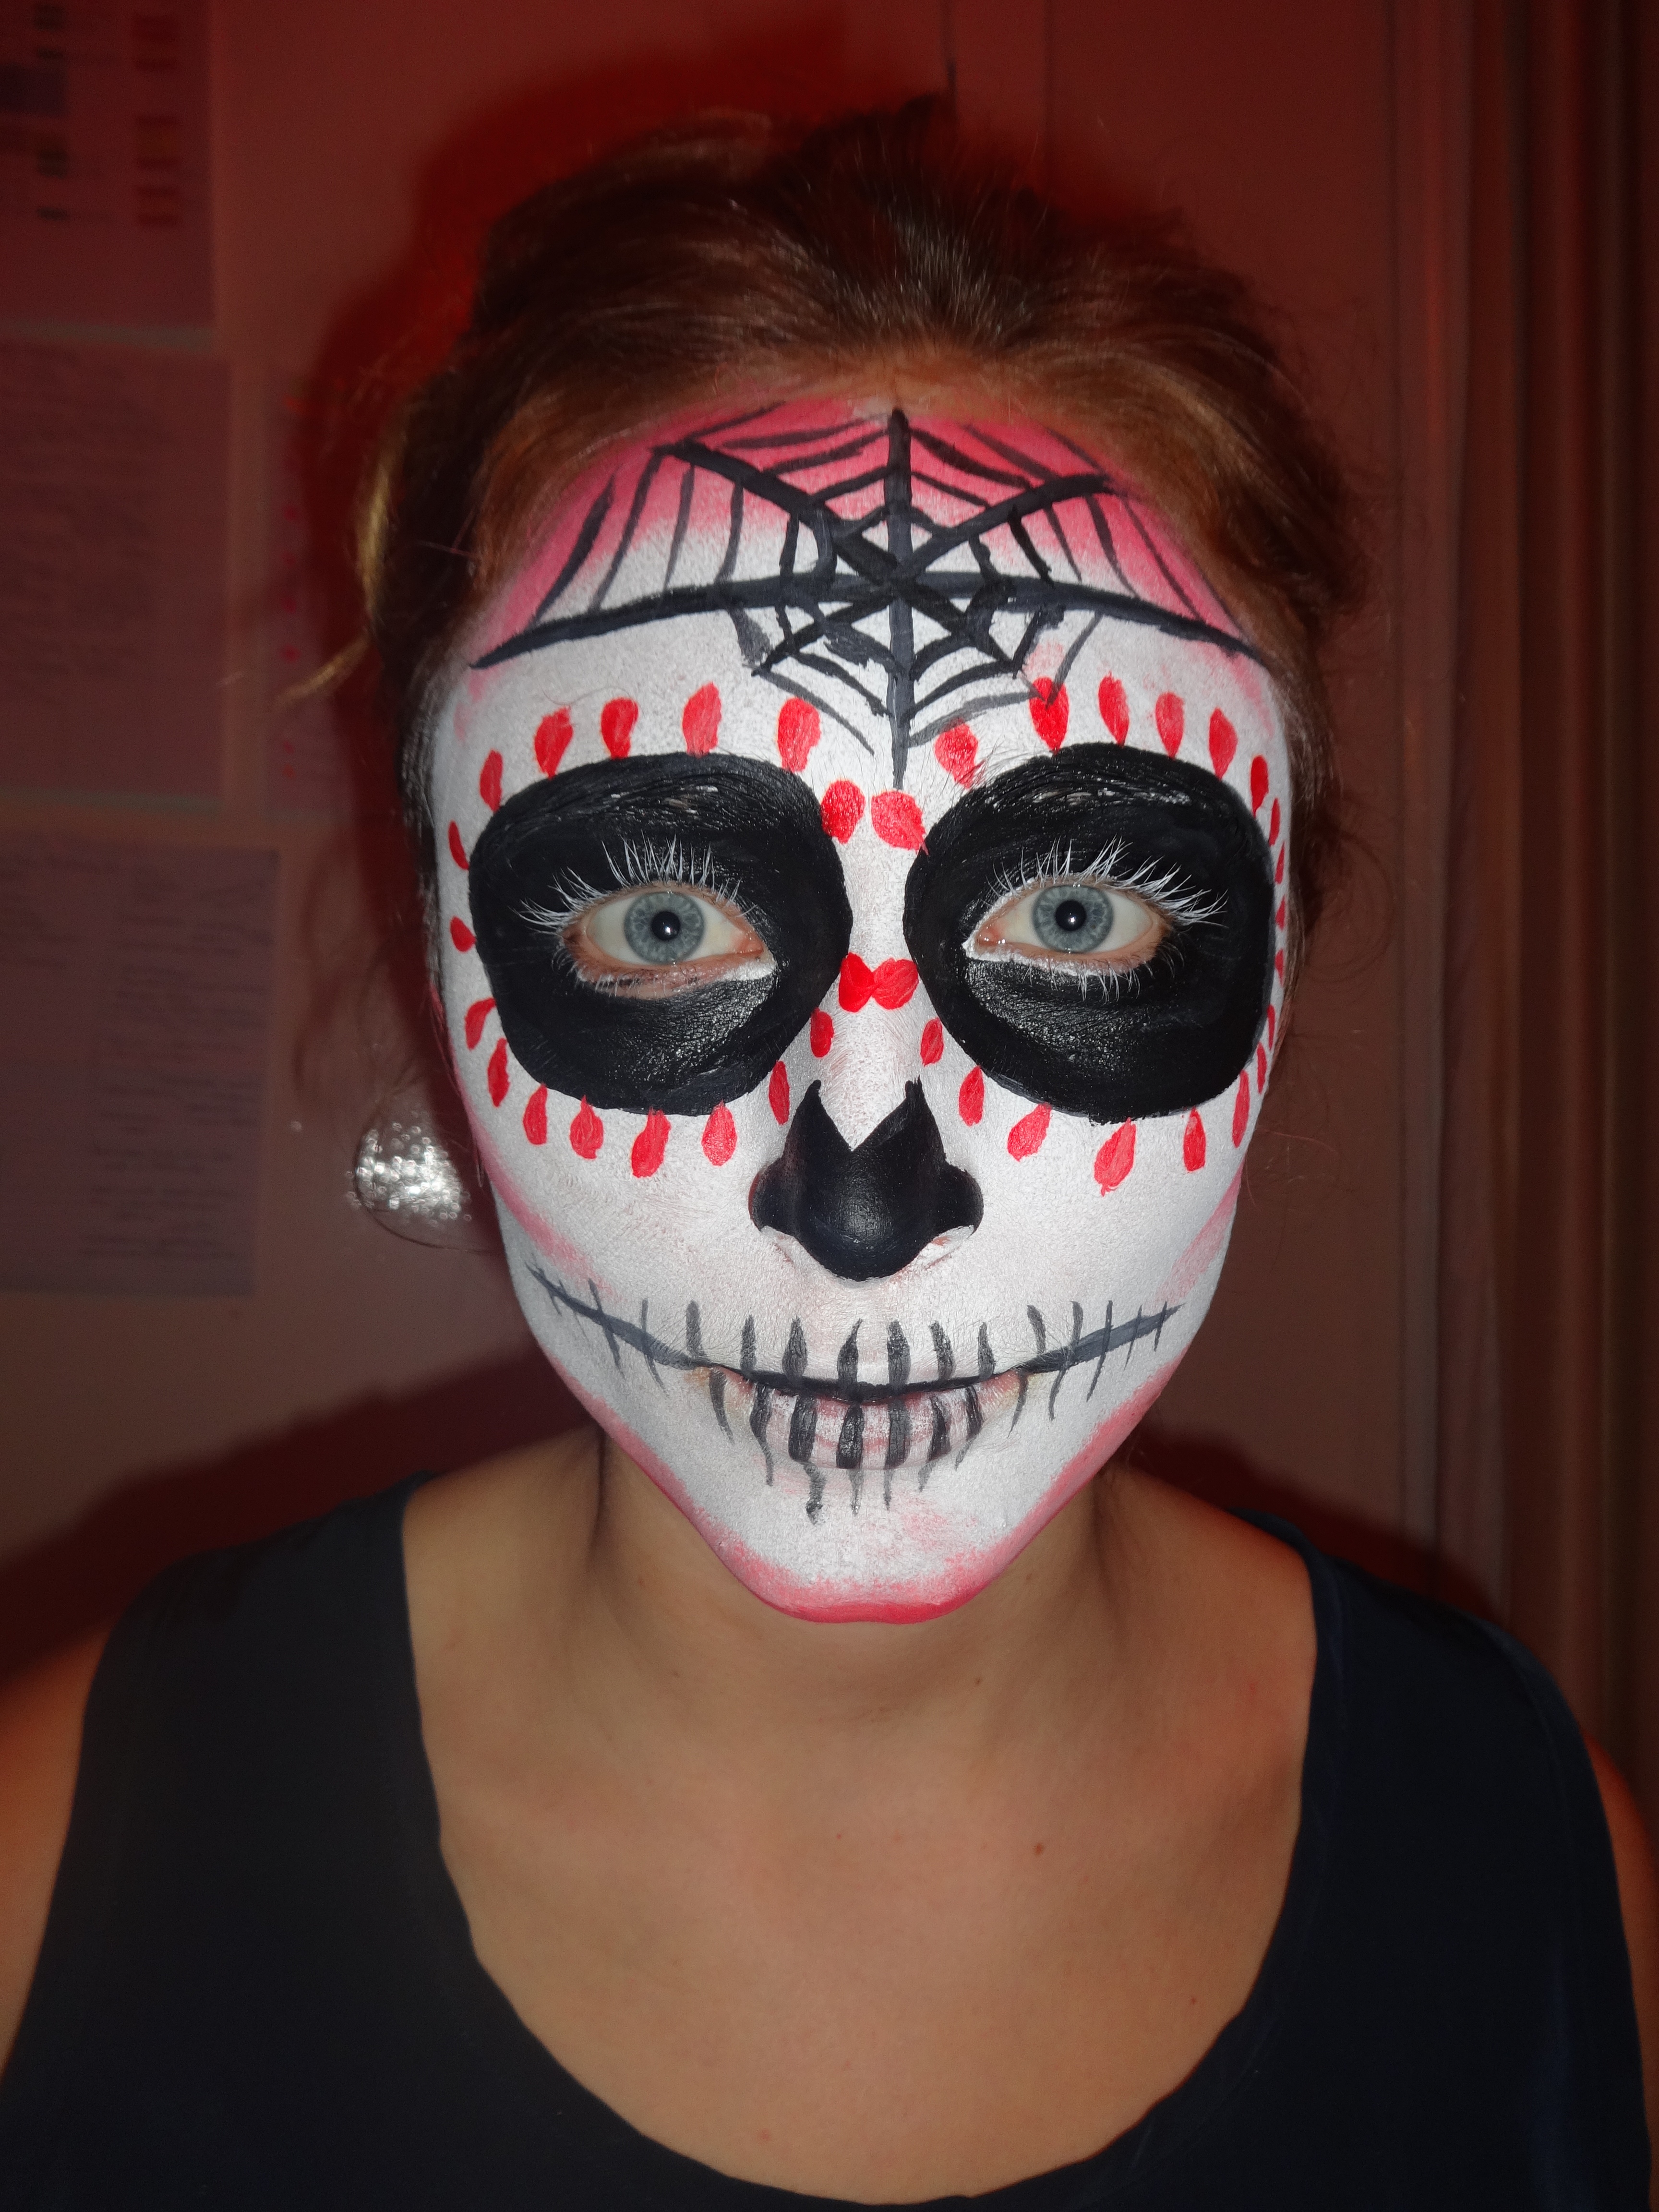
Paint on a black smile line either side of your lips. Depending on how moody and menacing you want to look you can either keep this straight or curve it upwards. Next, paint the teeth lines on both top and bottom lips and along the entire length of the smile line.
Step 7
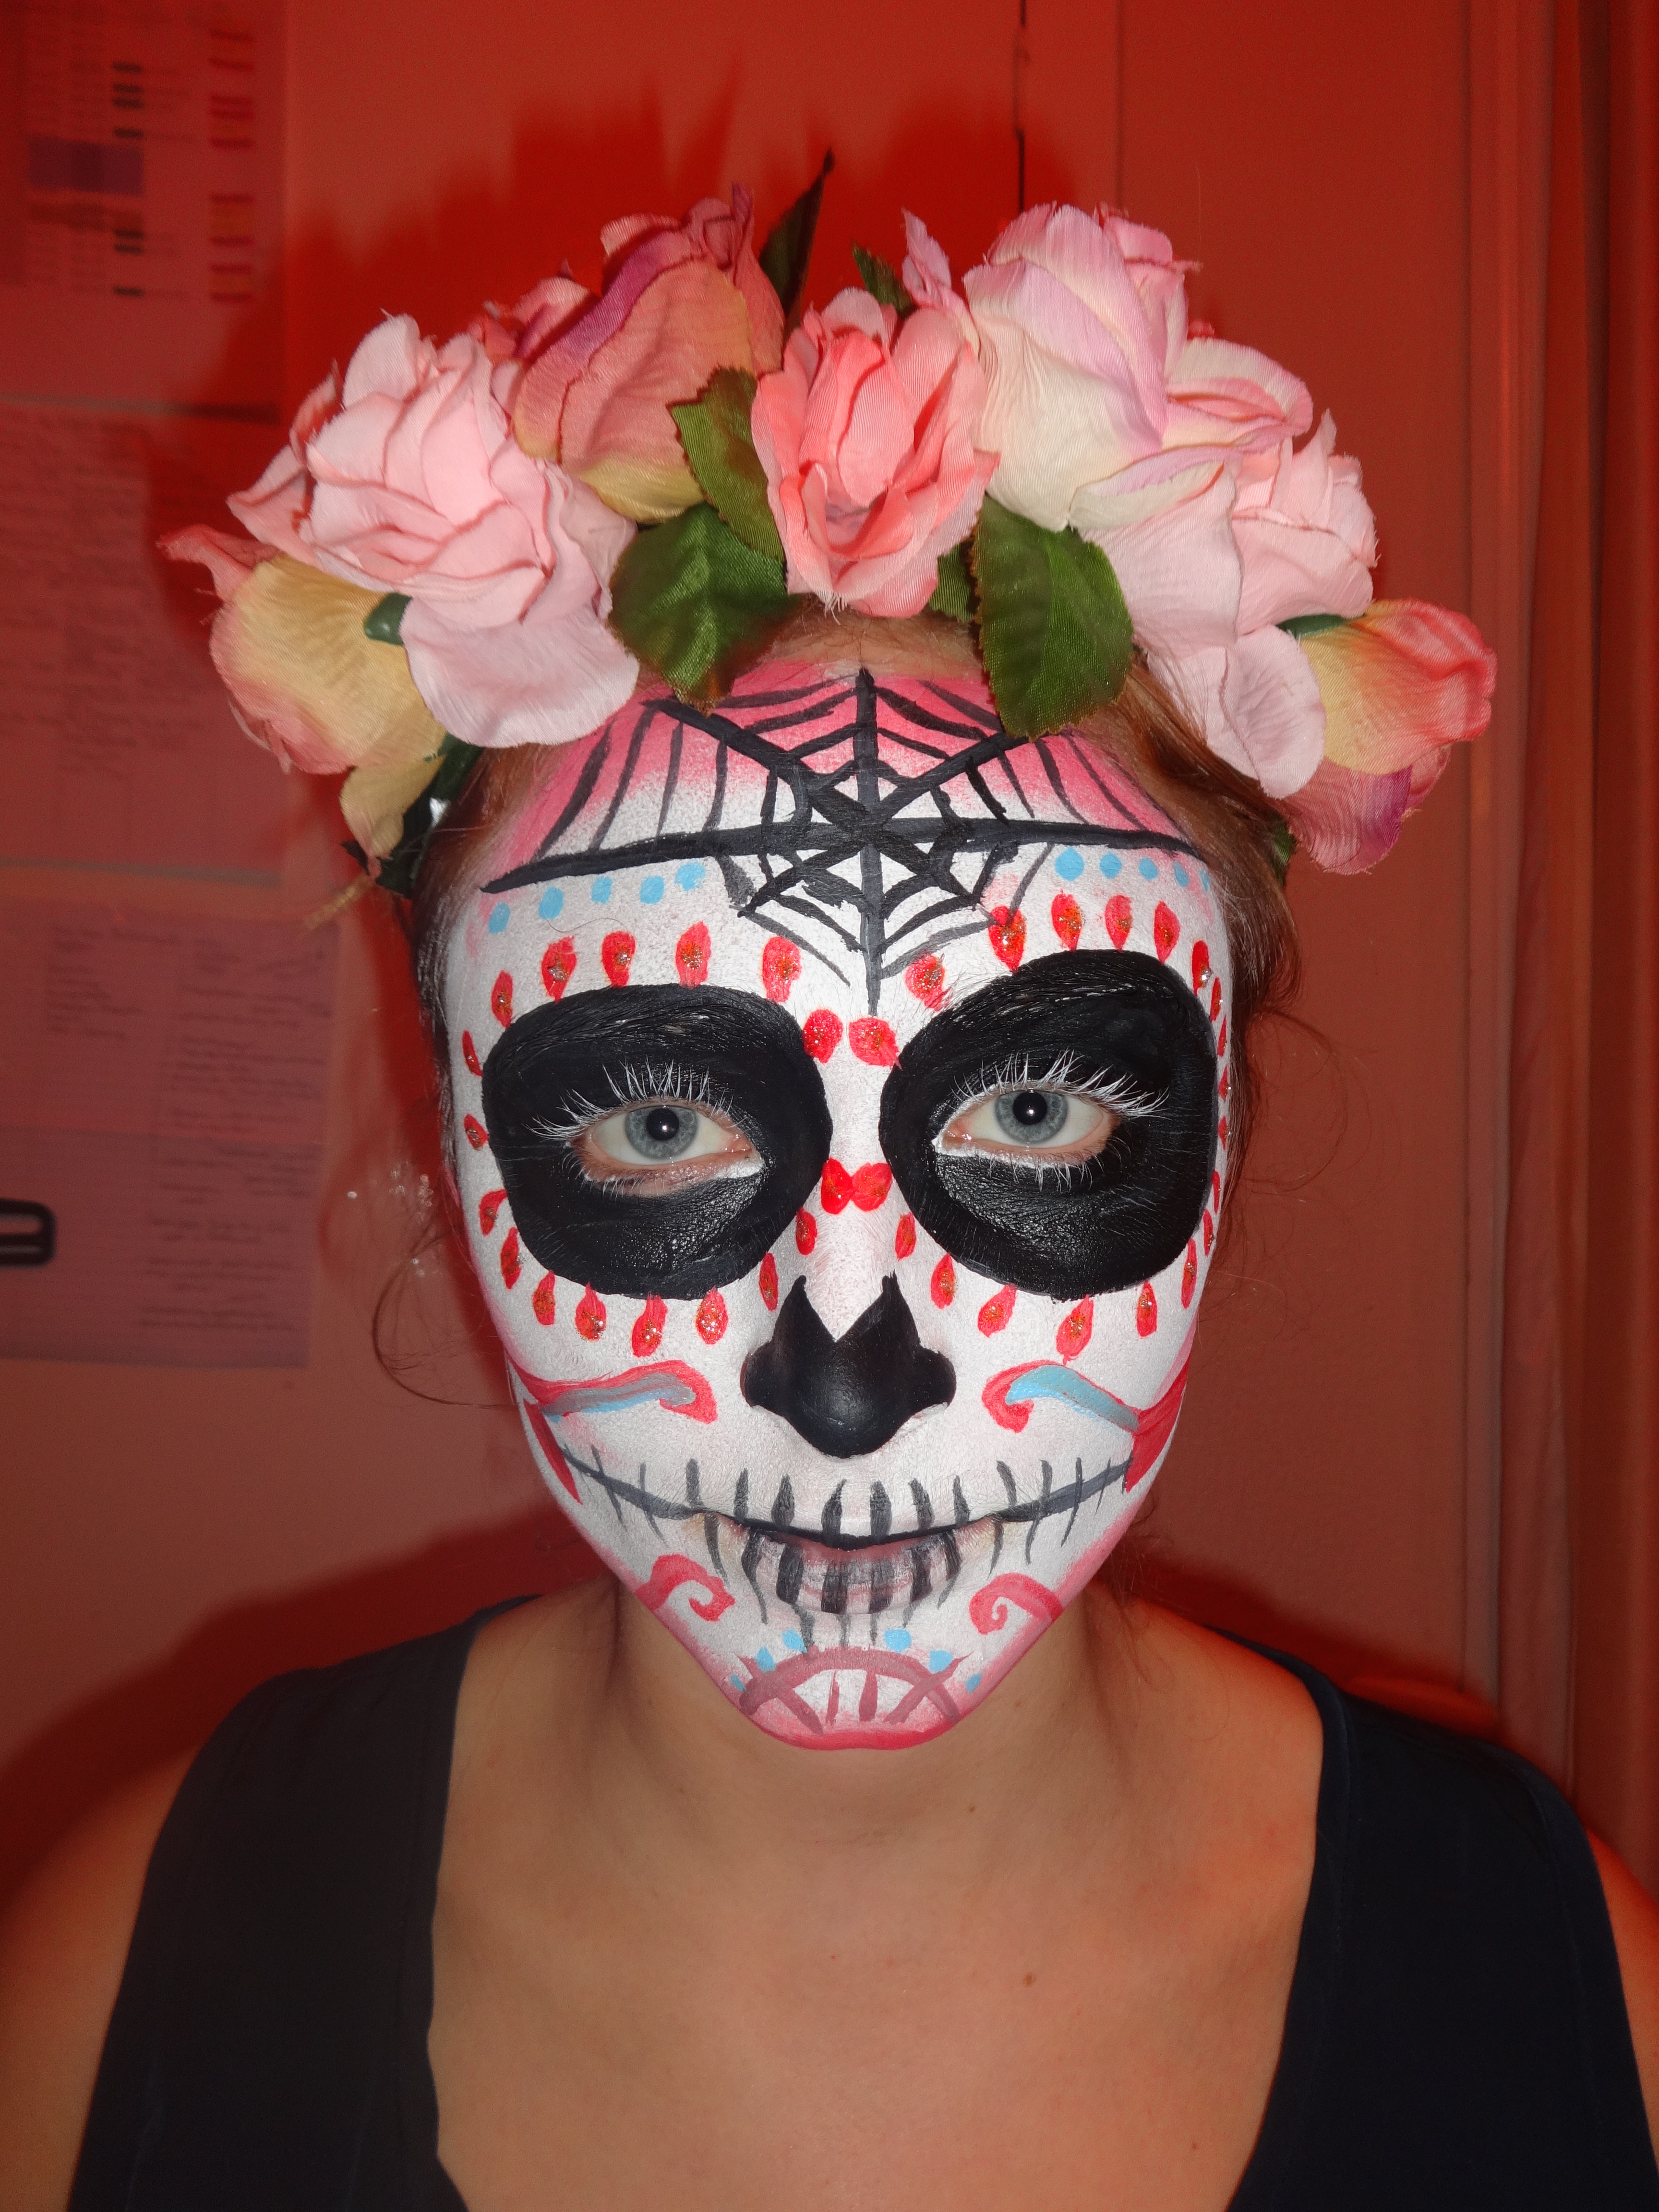
Add some swirls on the cheeks and chin in the colours of your choice. Adding polka dots below the spider web is also a nice way of tying in multiple colours. Feel free to add glitter around the eyes for an extra dazzle and pop on your floral crown for the final flourish!
There’s no doubt that the Skeleton and the Sugar Skull are AMAZING Halloween looks, despite being quite sophisticated and detailed we’re sure that you’ll be able to recreate them easily following our step by step guide. If you’re up for the challenge, tweet and tag us your results on Instagram @sotontab.
For MORE Halloween ideas, see our first installation of tutorials here.

Southampton University bans Stanley cups in lectures after damage caused by leakages
Students carrying the cups will be asked to leave them outside lecture halls inside a ‘Stanley holding pen’

Russell Group student stalked lecturer and booked registry office for their imaginary wedding
He also printed out pictures of her six year old son and called himself her ‘husband’ and ‘dear slave’


The Soton Tab is looking for new writers and we want you!
We’re hosting an open meeting on Thursday 23rd March at 4pm over Zoom

Get your diaries out: These are all the upcoming Southampton Uni strike dates in one place
Staff are going on strike for 18 days in the next two months


Southampton Uni fire which saw students evacuated from the area was caused by a ‘chiller unit’
Smoke spread across three floors of the uni building

Southampton Uni promises to read out grads’ names and shake their hand at graduation
Students resorted to shaking each other’s hands in the summer ceremonies at St Mary’s


Confirmed: Southampton Uni staff are going on strike for three days this month
The UCU say strikes could continue in the new year as well as a potential marking boycott

Sustainable queens: Southampton officially 18th best in UK according to new uni rankings
And no it’s not because of the city’s rats

Applications for The Soton Tab’s editorial team are now OPEN
We’re recruiting for Editor in Chief, News Editor, Features Editor and Social Media / TikTok Editor

Southampton is officially 12th best university in UK, according to new World Rankings
But do any of the other unis have Manzil’s though?

Freshers living in hotels after burst pipe ‘floods’ Unite Students accommodation
Videos show water gushing from the ceiling and down corridors

As a 2020 grad, I waited two years for my graduation ceremony – and it was a car crash
I love waiting for two years to not even have my name called out on stage x

A Russell Group uni isn’t reading out its grads’ names at graduation ceremonies this week
And the grads aren’t even getting a handshake on stage!!

Southampton student gives birth on the toilet without knowing she was pregnant
Jess Davis thought she was just experiencing period pain

Reddit theories about what will happen in Georgie and Mandy Young Sheldon spin off show
Will the couple inevitably split up??

Petitions and statements: All the biggest drama that has come since Bridgerton season three
The Bridgerton universe is shaking!

Ariana Grande is getting dragged for saying her dream dinner date is Jeffrey Dahmer
‘Joking about wanting to have dinner with him is sick and horribly offensive to the victims’ families’

Travelling the world and working retail: Inside Jess’s life outside of the Love Island villa
She absolutely gives retail manager energy


Eden reveals Lucinda’s ‘very upset’ with Timothy and thought they’d be ‘friends for life’
Eden described Tim as ‘pretty rogue’ when it comes to friendships

Chris from Perfect Match is claiming the season two cast had a ‘treaty’ to rig the final vote
‘Did Nigel and Christine deserve to win? Absolutely not’

There are loads so here’s a rundown of the sloppiest editing errors in Bridgerton season three
How did no one spot any of these ??

The policies of each UK political party on universities and how much they plan to spend
The Green Party wants to abolish tuition fees

The Love Island 2024 cast are the most unlikeable ever, and this Islander rundown proves it
They’re all doing my head in tbh

Here are all the biggest Gilmore Girls plot holes you won’t believe you never noticed
One character literally returns from the dead?!


This grad wrote her dissertation on Olivia Rodrigo and she actually signed it at her concert
Imagine being called a smart girl by Olivia Rodrigo

All the clues that Joshua Bassett’s new music is about Olivia Rodrigo and Sabrina Carpenter
It’s drivers license summer all over again

Inside wild Love Island theory Grace and Joey plotted to get Konnor to recouple with her
The conspiracy theories with these two have me hooked

The first Love Island 2024 brand deal is already here – and it’s with Samantha!
She was dumped just days ago

The Bear cast just confirmed nothing romantic will happen between Sydney and Carmy
Jeremy Allen White and Ayo Edebiri firmly shut down romance rumours ahead of season three

Julia Quinn defends Michaela decision, insists it will make Bridgerton more ‘inclusive’
She clarified Francesca’s season will still be the most ‘heart wrenching and emotional’ of the show

Omg, someone thinks they’ve spotted Reynolds in Bridgerton season three and I’m welling up
Is someone cutting onions??

Here’s exactly when and how Ser Criston Cole finally dies in the House of the Dragon books
This is a Ser Criston Cole hate club now

These Russell Group uni cities have been named the best to live in across the globe right now
Fallowfield pulling through